Lately I have been working on implementing and testing OpenRoaming with different Wi-Fi vendors. If you don’t know about OpenRoaming, it is a global initiative from the Wireless Broadband Alliance that simplifies and secures the process of connecting to Wi-Fi networks. Basically, it allows to create guest networks that use 802.1x authentication and leverages Passpoint (HotSpot 2.0) for automatic and frictionless connection.
Today I am sharing a procedure to configure OpenRoaming on a Cisco infrastructure using a C9800 controller and Cisco Spaces (formerly known as Cisco DNA Spaces). The main advantage of Spaces is that it takes care of all the configuration in the background (generating certificates, establishing trust and connecting to Identity Providers…). Yet, you still have some steps to follow to configure Spaces and the controller. Let’s get to it.
Prerequisites
For this tutorial, you will need:
- Cisco Spaces with a “See” license level minimum
- Someway to host the Spaces Connector which comes as a VM (VMware or Hyper-V are supported)
Connector installationg & configuration
- Install Cisco Spaces Connector which is a VM that runs on your network and makes the bridge between Spaces in the cloud and your C9800 controller:
- Download link: https://software.cisco.com/download/home/286323456/type/286322783/release/
- Documentation: https://www.cisco.com/c/en/us/td/docs/wireless/cisco-dna-spaces/connector/config/b_connector/m_overview.html
- When the VM first starts, you only need to input IP parameters and create credentials. Once installation is complete, Connector is reachable through HTTPS.
- Join the Connector to Spaces: on Spaces, go to menu Setup > Wireless Networks (https://dnaspaces.eu/setup/connectors)
- Add menu “Connect via Spaces Connector”:

- In menu “Connect via Spaces Connector”, create a new Connector:
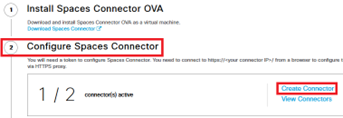
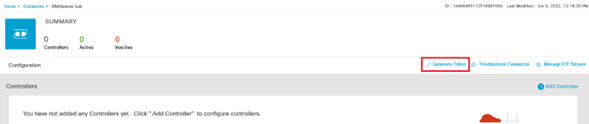
- Once the connector is created, you are redirected to the Connector configuration. Click on Generate Token et copy the Token:
- On Cisco Spaces Connector, click on « Setup » next to « Configure Token » et paste the Token:

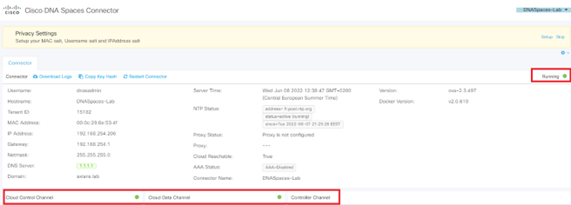
- The Connector then establishes connection with Cisco Spaces to download its configuration. After a few minutes, you should see it properly connected:
- Add menu “Connect via Spaces Connector”:
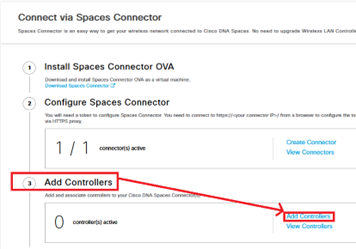
- Configure the communication with the C9800 by going to Spaces, menu Setup > Wireless Networks:
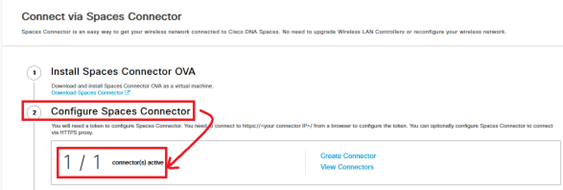
- In section « Connect via Spaces Connector », step #2 is complete and we can now see the Connecter:
- In step #3, click on Add Controllers :
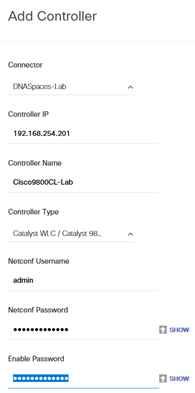
- Enter the C9800 information so the Connector can connect to it:
- Click « Test Connectivity » to try:

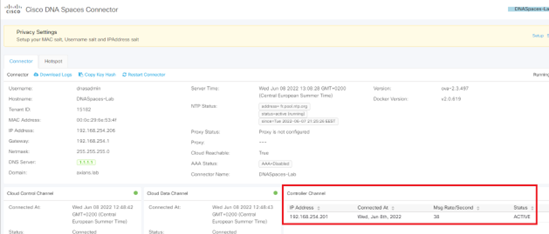
- Save the controller configuration. On the Connector, you can now see it is communicating with the controller:
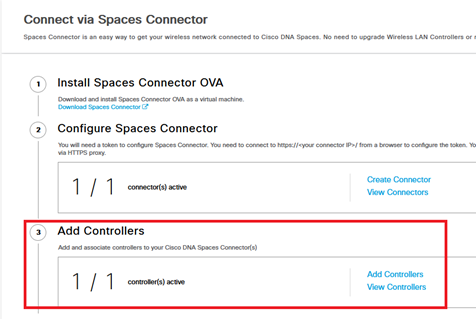
- On Spaces, the controller should then appear as Active:
- In section « Connect via Spaces Connector », step #2 is complete and we can now see the Connecter:
OpenRoaming configuration
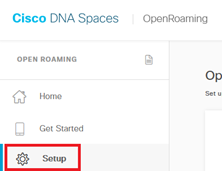
- On Spaces, open the OpenRoaming application and go to the Setup menu: https://dnaspaces.eu/openroaming/setup
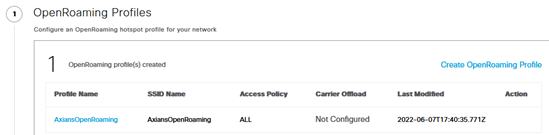
- In step #1, create an OpenRoaming profile. This should match the name of the SSID you will create later on the C9800 controller.
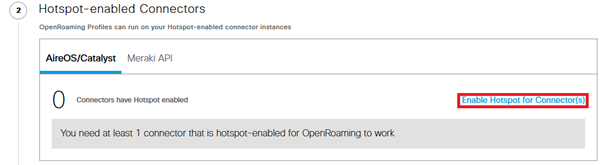
- In step #2, click « Enable Hotspot for Connectors »:
- Spaces should provide a new Token. Copy and paste this Token on the Connector, menu Settings > Configure Token:


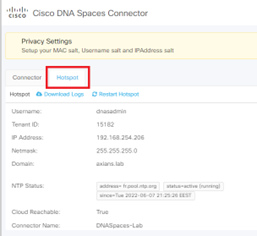
- Once you enter the Token on the Connector, it refreshes its configuration. Once finished, a new tab called “Hotspot” should appear on the Connector. You can check the “Hotspot” feature state:
- Back on Spaces, the Connector should now appear:

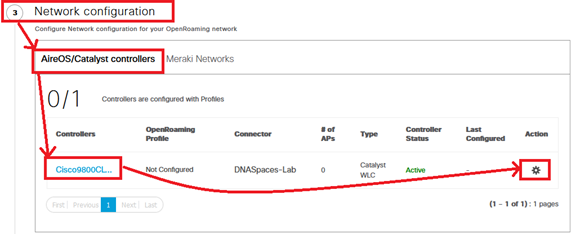
- In step #3, the controller we previously registered should appear. Click on the Settings button next to it:
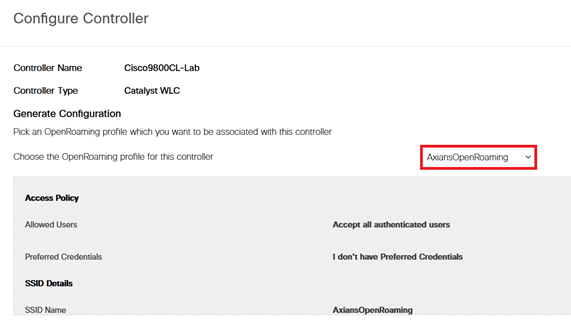
- In the menu that opens, choose the OpenRoaming profile we created earlier and click “Continue”:
- Choose Catalyst 9800 as your controller, type the SSID name click on “Show Configuration”:
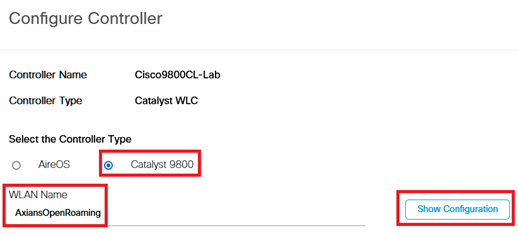
- Copy the configuration displayed on the screen. This configuration will be useful in the next step. IMPORTANT: all the configuration will not be injected, only the part with ANQP configuration is needed.
- In step #1, create an OpenRoaming profile. This should match the name of the SSID you will create later on the C9800 controller.
C9800 configuration
- On the C9800, import the Root CA used by Cisco: https://www.cisco.com/c/en/us/td/docs/solutions/Enterprise/Mobility/DNA-Spaces/cisco-dna-spaces-config/dnaspaces-configuration-guide/m_wlc-config.html#eWLCconnection
(config)#crypto pki trustpool import url http://www.cisco.com/security/pki/trs/ios.p7b- You can check the Root CA with this command:
show crypto pki trustpool | section DigiCert Global Root CA- On the C9800, create a AAA server for the Connector (default RADIUS PSK used by the Connector is “radsec”):
radius server OpenRoaming_Connector
 address ipv4 192.168.254.206 auth-port 1812 acct-port 1813
 key radsec
aaa group server radius Grp-OpenRoaming
 server name OpenRoaming_Connector
 deadtime 5
 mac-delimiter hyphen
aaa authentication dot1x authe-OpenRoaming group Grp-OpenRoaming
aaa authorization exec authz-OpenRoaming group Grp-OpenRoaming
aaa accounting identity accnt-OpenRoaming start-stop group Grp-OpenRoaming
radius-server attribute wireless accounting call-station-id ap-macaddress-ssid
radius-server attribute wireless authentication call-station-id ap-macaddress-ssid- On the C9800, create the SSID:
wlan AxiansOpenRoaming 105 AxiansOpenRoaming
 ccx aironet-iesupport
 dot11ax target-waketime
 dot11ax twt-broadcast-support
 no security ft adaptive
 security dot1x authentication-list authe-OpenRoaming
no shutdown- On the C9800, paste the ANQP configuration you copied earlier from the Connector. IMPORTANT: you should only copy the ANQP configuration. As reference, here is what I am copying on my controller:
wireless hotspot anqp-server OpenRoaming type open-roaming
domain cisco.com
nai-realm 1.openroaming.org
eap-method eap-ttls
inner-auth-non-eap pap
nai-realm 2.openroaming.org
eap-method eap-ttls
inner-auth-non-eap mschap-v2
nai-realm 3.openroaming.org
eap-method eap-tls
nai-realm 4.openroaming.org
eap-method eap-aka
nai-realm open.openroaming.org
eap-method eap-ttls
inner-auth-non-eap pap
network-type free-public internet-access allowed
open-roaming-oi All beacon- Create a Policy Profile:
wireless profile policy Local-OpenRoaming-Vlan251
 accounting-list accnt-OpenRoaming
 no central dhcp
 no central switching
 hotspot anqp-server OpenRoaming
 session-timeout 3600
 vlan 251
no shutdown- Add the SSID and its Policy Profile to a Policy tag:
wireless tag policy Axians_Policy_Lab
 wlan AxiansOpenRoaming policy Local-OpenRoaming-Vlan251
Testing
There you go, you now have a HotSpot 2.0 SSID being broadcasted by your access points. Authentication is handled by the Connector which acts as a RADIUS server for your C9800 controller. Then, the authentication magic should happen in the background thanks to the communication between the Connector and Cisco Spaces.
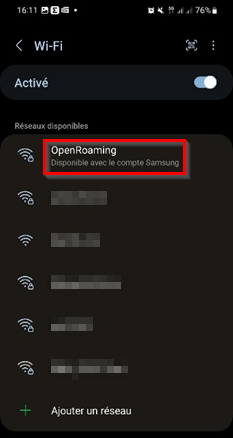
On Android devices from Samsung and Google, you should be able to connect automatically without any profile because OpenRoaming is natively supported (since Android 11) and uses your Samsung/Google account. I came accross a phone where the HotSpot 2.0 option was disabled (probably by default?) so make sure to take a look at the network settings:
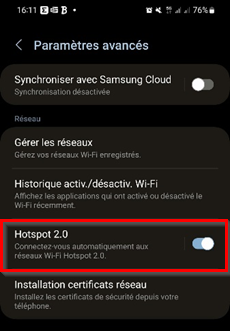
The OpenRoaming SSID should appear with a comment right underneath it saying “Available with your Samsung account”:
For other non-Android devices (Apple, Windows…), a profile or an application (that will install a profile) is required. I recommend using the profile provided by the WBA:
https://provision.connectionassist.com/wba
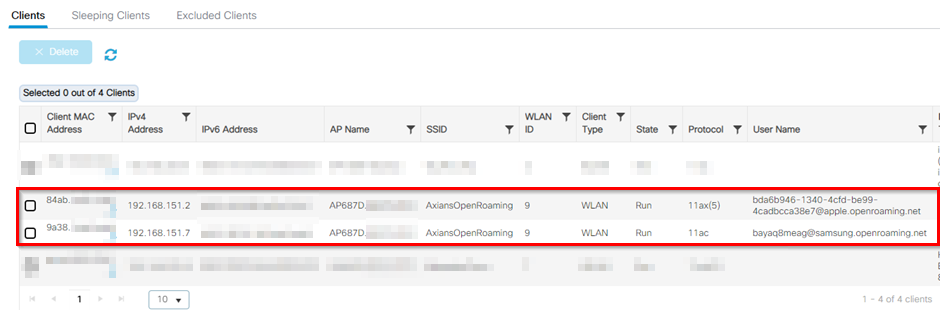
Here is an example of two OR clients connected to my C9800 controller (an iPhone and a Samsung smartphone). Take a closer look at the “User name” column:
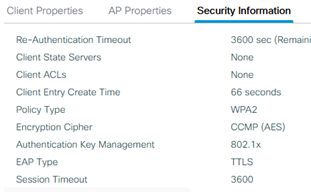
In the Security tab of the client, you can see it uses EAP-TTLS when authenticating:
Reference
There is a good video on YouTube. I used it during my testing and while writing this procedure, you can check it here: https://www.youtube.com/watch?v=XsD6e6F6u4k&t=336s